Corporate email setups, Turkey/Sweden DNS records, Google Ads & Google Maps access guides, and launch checklist.
APPLE IOS MAIL
iPhone (iOS) Corporate Email Setup
Follow these step-by-step instructions to connect your corporate email account (yourname@yourdomain.com) to the native Apple Mail application on iPhone or iPad.
• Incoming & Outgoing Server Hostname:mail.yourdomain.com
Step-by-Step iPhone Setup Guide:
Open Settings on your iPhone and tap Mail.
Tap Accounts and select Add Account.
Choose Other at the bottom of the list, then tap Add Mail Account.
Enter the New Account details:
• Name: Your Company or Personal Name (Displayed in outgoing mail)
• Email: yourname@yourdomain.com
• Password: Your email password
• Description: Corporate Mail (or your domain name)
Tap Next at the top right.
Ensure IMAP is selected at the top (do not choose POP3).
Incoming Mail Server Settings:
• Host Name: mail.yourdomain.com
• User Name: yourname@yourdomain.com (Important: You MUST type your full email address!)
• Password: Your email password
Outgoing Mail Server (SMTP) Settings:
• Host Name: mail.yourdomain.com
• User Name: yourname@yourdomain.com (Note: Even if it says "Optional", it is REQUIRED to send emails!)
• Password: Your email password
Tap Next. The server will verify the credentials.
Make sure Mail is toggled on (green), then tap Save.
Cannot Send Emails on iPhone? (SMTP Port Verification):
Go to Settings > Mail > Accounts > Your Account > Account > Outgoing Mail Server (SMTP). Tap mail.yourdomain.com. Verify that Use SSL is turned on and Server Port is set to 465 or 587.
GMAIL MOBILE APP
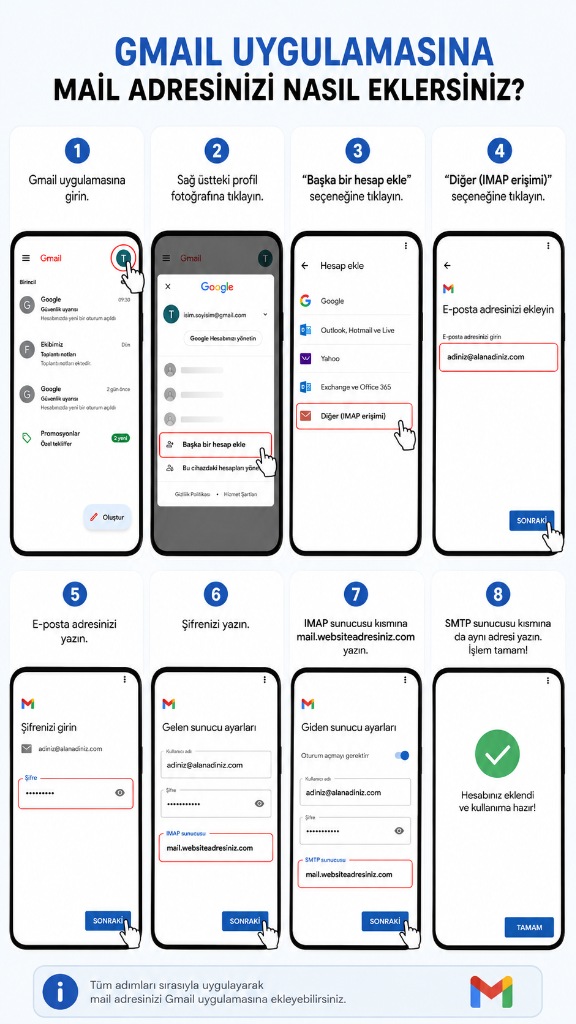
Adding Your Email Address to the Gmail App
If you use the official Gmail app on Android or iOS, you can easily connect your custom domain mailbox via IMAP.
Gmail mobile app 8-step visual walkthrough
8 Steps to Setup in Gmail:
Open the Gmail app on your device.
Tap your profile picture in the top-right corner.
Tap "Add another account".
Select "Other (IMAP access)" from the account provider list.
Enter your email address (e.g. yourname@yourdomain.com) and tap Next.
Enter your email password and tap Next.
Incoming Server Settings:
• Username: yourname@yourdomain.com
• Password: Your email password
• IMAP server:mail.yourdomain.com and tap Next.
Outgoing Server Settings:
• Require sign-in: Enabled (On)
• Username: yourname@yourdomain.com
• Password: Your email password
• SMTP server:mail.yourdomain.com and tap Next.
Account Ready!
Setup complete! Once you see "Your account is added and ready for use", you can immediately send and receive emails via Gmail.
MICROSOFT OUTLOOK (PC/MAC)
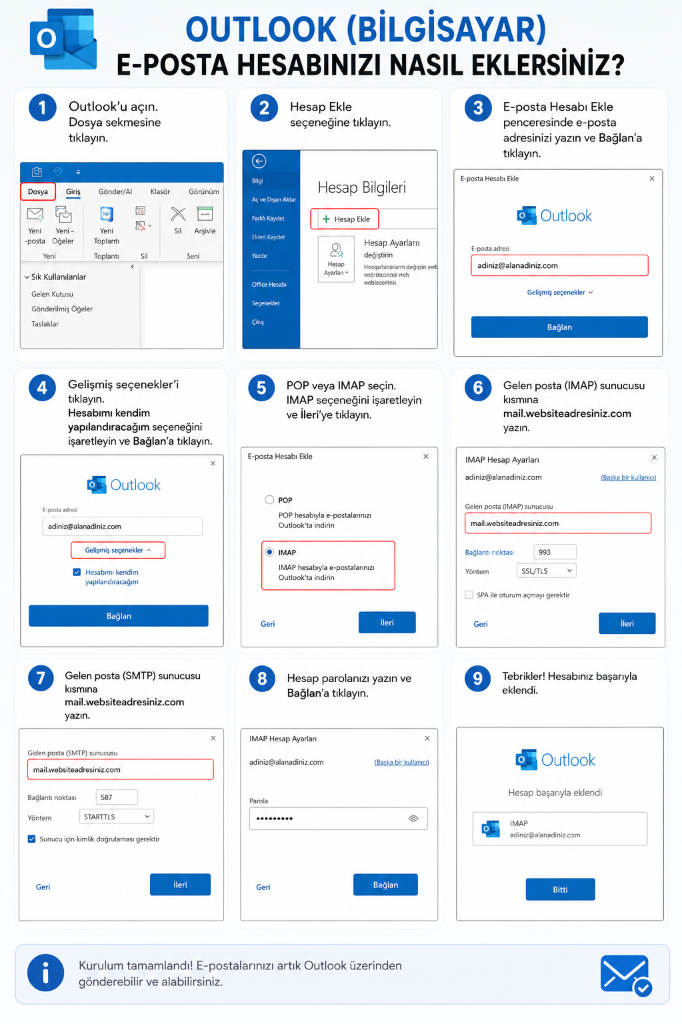
How to Add an Email Account to Outlook (Desktop)
To connect your corporate email account to desktop Microsoft Outlook on Windows or macOS using SSL/TLS encryption, follow these 9 steps.
Microsoft Outlook desktop configuration steps
9 Steps to Outlook Setup:
Open Outlook and click the File tab in the upper-left corner.
In the Account Information window, click + Add Account.
Enter your email address (e.g. yourname@yourdomain.com) in the prompt.
Click Advanced options, check "Let me set up my account manually", and click Connect.
• Server:mail.yourdomain.com
• Port:587
• Encryption method:STARTTLS (or Port 465 with SSL/TLS)
• Check the box: "Require logon using Secure Password Authentication (SPA)" or verify authentication is enabled.
Click Next.
Enter your email password and click Connect.
Congratulations! Your account was successfully added. Click Done to finish.
MACOS MAIL
Mac (Apple Mail) Corporate Email Setup
Setup instructions for the native macOS Mail client on MacBook or iMac:
Open Mail and click Mail > Add Account... in the top menu bar.
Select "Other Mail Account..." at the bottom and click Continue.
Enter your Name, Email address (yourname@yourdomain.com) and password, then click Sign In.
If automatic configuration prompts for manual hostnames:
• User Name: yourname@yourdomain.com
• Account Type: IMAP
• Incoming Mail Server:mail.yourdomain.com
• Outgoing Mail Server:mail.yourdomain.com
Click Sign In, select Mail, and click Done.
MOZILLA THUNDERBIRD
Mozilla Thunderbird Configuration Guide
Manual SSL configuration on the open-source client Mozilla Thunderbird:
Open Thunderbird, navigate to Account Settings > Account Actions > Add Mail Account.
Enter your name, email address, and password. Click "Configure manually".
Incoming Server (IMAP):
Server: mail.yourdomain.com | Port: 993 | SSL: SSL/TLS | Authentication: Normal Password
Outgoing Server (SMTP):
Server: mail.yourdomain.com | Port: 465 or 587 | SSL: SSL/TLS / STARTTLS | Authentication: Normal Password
Enter your full email address (yourname@yourdomain.com) as the username, click Re-test, and tap Done.
BROWSER ACCESS
Accessing Corporate Mail via Webmail
Access your corporate emails from any web browser (Chrome, Safari, Edge, Firefox) on any device without installing any software.
Webmail Access URL:
In your browser address bar, prepend webmail. to your domain name:
https://webmail.yourdomain.com
(For example, if your domain is yourbrand.com, your webmail URL is: https://webmail.yourbrand.com)
Login Credentials:
Username: Your full email address (e.g. info@yourbrand.com).
Password: Your defined email account password.
How to Change Your Password via Webmail:
Log in to Webmail (webmail.yourdomain.com).
Click your user profile icon in the upper-right corner.
Click Password & Security from the dropdown menu.
Enter your new secure password twice and click Save.
Setting Up Out-of-Office Autoresponders:
When you are traveling or out of the office, you can configure scheduled automatic reply messages by opening Autoresponders on the Webmail dashboard.
TECHNICAL REFERENCE
Port & Protocol Technical Reference Table
Official ports and encryption parameters used on VELOC corporate email infrastructure:
Swipe table horizontally to view all columns
Protocol
Recommended Port
Encryption Type
Description
IMAP (Incoming)
993
SSL / TLS
Real-time two-way synchronization across all devices (Recommended).
POP3 (Incoming)
995
SSL / TLS
Downloads messages locally; does not sync folders across devices.
SMTP (Outgoing)
465
SSL / TLS
Standard secure outgoing mail port (Apple iOS & modern clients).
SMTP (Outgoing Alt)
587
STARTTLS
Authenticated submission port for Outlook and Android clients.
Insecure Ports to Avoid:
Port 25 (blocked by ISPs for anti-spam filtering), Port 110, and Port 143 transfer plain unencrypted text and are disabled for security. Always use the SSL/TLS ports above.
DNS & INFRASTRUCTURE
Nameservers & DNS Routing (Turkey & Sweden Servers)
To point your domain name to VELOC cloud infrastructure, configure the following official Nameserver (NS) records at your domain registrar (GoDaddy, Namecheap, Google Domains, Cloudflare, etc.).
Turkey Server (Host 1 & Host 2)
For Turkey-hosted performance packages:
host1.narinhosting.com
host2.narinhosting.com
Sweden Server (Horizon & Orbit)
For European / Sweden cloud infrastructure:
horizon.dns-parking.com
orbit.dns-parking.com
How to Update Nameservers:
Log into the customer dashboard where you registered your domain name.
Navigate to Domain Management > DNS / Nameservers.
Select "Custom Nameservers".
Paste the two server hostnames assigned to your account into fields 1 and 2, then click Save.
DNS Propagation Timeline:
Global DNS propagation typically completes within 15 minutes to 4 hours. You can verify live worldwide propagation via dnschecker.org.
Direct A and CNAME Records (If Managing External DNS):
Type: A | Name: @ | Value: [Your Server IP Address]
Type: CNAME | Name: www | Value: yourdomain.com
Type: A | Name: mail | Value: [Your Server IP Address]
Type: CNAME | Name: webmail | Value: mail.yourdomain.com
Type: MX | Name: @ | Value: mail.yourdomain.com | Priority: 10
AUTHENTICATION & SECURITY
SPF, DKIM and DMARC Email Deliverability Records
To comply with Google and Yahoo 2024+ sender guidelines and ensure 100% inbox deliverability, configure the following DNS TXT verification records:
SSL certificates encrypt web traffic and prevent browser "Not Secure" warnings.
AutoSSL System:
All projects on VELOC infrastructure are automatically provisioned with Let's Encrypt / Sectigo SSL certificates that renew every 90 days seamlessly in the background.
Enforce HTTPS via .htaccess:
RewriteEngine On
RewriteCond %{HTTPS} off
RewriteRule ^(.*)$ https://%{HTTP_HOST}%{REQUEST_URI} [L,R=301]
FILE TRANSFER
FTP / SFTP File Deployment Guide
To transfer website files or assets, use an FTP client such as FileZilla or WinSCP with these parameters:
Swipe table horizontally to view all columns
Parameter
Value
Host:
ftp.yourdomain.com or Server IP Address
Protocol:
FTP (File Transfer Protocol) or SFTP (SSH)
Port:
21 (Standard FTP) / 22 (SFTP)
Root Directory:
/public_html/ or /httpdocs/
PRE-FLIGHT PROTOCOL
Live Launch Checklist (Complete 12-Step Technical Audit)
The 12-step technical launch checklist enforced by the VELOC Studio engineering team for every production web deployment:
Swipe table horizontally to view all columns
#
Control Parameter
Technical Standard & Verification
Status
1
Image Optimization & WebP
All raster assets converted to WebP format, capped at 1200px max-width, with native lazy-loading enabled.
Verified
2
SEO Meta Tags & Canonical
Unique Meta Titles, Descriptions, and Canonical link tags defined across 100% of pages.
Crawler rules configured in robots.txt; comprehensive sitemap.xml generated in the root directory.
Verified
5
Search Console & GA4 Setup
Domain verified in Google Search Console, sitemap submitted, and GA4 tracking script verified.
Verified
6
DNS & Nameserver Propagation
NS pointed to Turkey/Sweden hosting servers, and global propagation verified across worldwide resolvers.
Verified
7
Email MX, SPF, DKIM & DMARC
Mail routing verified via MX records; anti-spoofing security enforced with SPF, DKIM, and DMARC TXT records.
Verified
8
Favicon & Open Graph Suite
SVG, 48px PNG, ICO, Apple Touch icon, and 1200x630px OG social preview verified in Google SERP and social channels.
Verified
9
Mobile & Cross-Browser UX
Tested across Safari (iOS), Chrome (Android), Firefox, and Edge on all responsive viewports.
Verified
10
Contact Form SMTP Delivery
Contact and quote wizard submission forms tested with server-side sanitization and honeypot spam protection.
Verified
11
Core Web Vitals Performance
Google PageSpeed LCP, CLS, and FID scores verified in green zone; Gzip/Brotli compression enabled.
Verified
12
Custom 404 & Broken Link Scan
Full site scan confirms zero broken links; bespoke branded 404 page handles invalid routes gracefully.
Verified
TROUBLESHOOTING
Corporate Email Troubleshooting & Error Codes
1. "Invalid username or password" Error:
Cause & Fix: You may have entered only your name (e.g. "alex"). You MUST enter your full email address (e.g. alex@yourdomain.com). Verify credentials first via webmail.yourdomain.com.
2. "550 Relay Access Denied" or Cannot Send Emails:
Cause & Fix: Outgoing SMTP authentication is disabled. Enable "My outgoing server requires authentication" in Outlook or your phone settings and supply your full credentials.
3. "Cannot connect to server" or Connection Timeout:
Cause & Fix: Local ISP firewalls may block standard ports. Switch your outgoing port to 587 (STARTTLS) or 465 (SSL/TLS).
4. "Mailbox Quota Exceeded":
Cause & Fix: Your email storage limit has been reached. Log into webmail.yourdomain.com and permanently delete old emails with large attachments and empty your Trash folder.
GOOGLE ADS ACCESS GUIDE
How to Grant Access to Your Google Ads Account
To allow your digital marketing agency (VELOC Studio), PPC specialist, or team members to manage your advertising campaigns without ever sharing your password, you can grant secure, role-based access directly through Google's official permissions system.
Critical Security Rule: Never Share Your Password!
Never share your Google/Gmail account password with anyone, including agencies! Google Ads has a built-in user delegation system allowing each person to log in securely with their own individual credentials.
Method 1: Direct User Invitation (Step-by-Step):
Go to ads.google.com and sign in with your administrator Google account.
Click on Admin in the left main navigation menu.
(Note: In older Google Ads layouts, click the wrench icon labeled Tools and Settings > Setup at the top).
Click on Access and Security.
Ensure you are on the Users tab and click the large blue "+" (Add User) button.
Enter Email Address:
Enter the Google account email address of the agency or specialist you are granting access to:
info@veloc.com.tr
Choose Account Access Level (Role):
Select the permission level. For marketing agencies, Standard access is typically recommended:
Swipe table horizontally to view all columns
Access Level
Manage Campaigns
View/Edit Budgets
Billing Access
Add/Remove Users
Recommended For
Standard
Full Access
Full Access
Can Edit
No Access
Agencies & Campaign Managers (Best Choice)
Admin
Full Access
Full Access
Full Access
Full Access
Business Owners & Co-Founders
Read Only
Cannot Edit
View Reports
No Access
No Access
External Auditors & Observers
Billing Only
No Access
No Access
Full Billing
No Access
Accounting & Finance Department
After choosing the role, click the blue "Send Invitation" button at the bottom of the page.
Acceptance: The recipient receives an invitation link from Google. Once they click "Accept Invitation", access is immediately activated.
Method 2: Manager Account (MCC) Link (Faster for Agencies):
If our agency requests a connection via our Google Partner Manager Account (MCC):
Provide your 10-digit Customer ID (XXX-XXX-XXXX) shown in the top corner of your Google Ads screen.
Our team submits a manager linking request.
Navigate to Admin > Access and Security > Managers tab and click "Accept" to approve in 10 seconds.
Revoking Access:
When a contract concludes, you can remove access anytime by visiting Access and Security and clicking "Remove Access" next to the user.
GOOGLE MAPS & BUSINESS PROFILE
How to Grant Access to Google Maps (Business Profile)
To let your digital marketing agency (VELOC Studio) or team manage your physical store/office location on Google Maps, update working hours, respond to customer reviews, post photos, and improve your local SEO rankings, you can invite them as a manager with full security.
Direct Google Search Management Interface:
Google now allows managing your business profile directly inside Google Search and Google Maps without using a separate dashboard. You can add managers directly from Google search results.
Step-by-Step Google Maps Delegation Guide:
Sign in to the Google Account (Gmail) that owns or manages your Google Maps business profile.
Open google.com and type "my business" or your exact business name in the search bar.
(The "Your business on Google" management card will appear at the top of results. Alternatively, visit business.google.com).
Click the three vertical dots (⋮) menu icon in the upper right corner of the management card.
Select "Business Profile settings" from the dropdown.
Click on "People and access" (or "Managers").
Click the blue "Add" (+ / Add) button in the top left of the managers list.
Enter the Email Address:
Enter our agency's Google email address:
info@veloc.com.tr
Select the Role (Manager or Owner):
Choose the appropriate role for the user:
Swipe table horizontally to view all columns
Role
Edit Hours & Business Info
Respond to Reviews
Post Photos & Updates
User Management
Delete Profile
Manager (Recommended for Agencies)
Full Access
Full Access
Full Access
No Access
Cannot Delete
Owner
Full Access
Full Access
Full Access
Can Add Users
Only Primary Owner can delete
Primary Owner
Founder
Founder
Founder
Full Rights
Absolute Owner
Security Tip: Why Choose "Manager" Role?
Granting "Manager" access is the safest and recommended practice. Managers can edit photos, working hours, phone numbers, and respond to customer reviews; however, they cannot delete your business listing or remove the primary owner.
After choosing the role, click the blue "Invite" button.
Confirmation: The invited party accepts the email invitation and management access becomes immediately active.
Troubleshooting & FAQ:
• "Searching 'my business' shows nothing": Ensure you are logged into the exact Google account linked to the listing. Switch accounts in the top right profile bubble if necessary.
• "Invitation email missing": Check the Spam or Updates folder in the recipient's Gmail inbox.
• Revoking Access: You can remove any manager at any time from the same menu (Three dots > Business Profile settings > People and access > Click user name > Remove).